Quick Answer: How to Clean Porcelain Tile (In 5 Simple Steps)
Cleaning porcelain tile the right way keeps your floors and walls looking like new for years without breaking out the big bucks or doing a whole lot of elbow grease. First things first, get rid of any loose dirt on the surface, then grab some gentle cleaners that won’t damage the tile, give it a good rinse and dry the whole thing – that’s basically it. This method works a treat on all types of porcelain tile – glossy, matte, textured, or even ones that try to look like wood – and will have an average room sparkling in no more than 20 minutes. Don’t make the rookie mistakes of using vinegar over and over, skipping the rinse or letting it air dry, as that’s just going to leave you with a dull, streaky mess that’s a right pain to deal with.
What You’ll Get Out of Reading This Guide
- The 5 simple steps to get porcelain tile sparkling without any streaks
- Why porcelain tile needs a different cleaning approach than its ceramic cousins
- What cleaners you can use that won’t do any lasting damage (or any damage at all for that matter)
- How to tackle different tile finishes – glossy, matte, textured or wood-look
- The grout cleaning tips the pros use without any harsh chemicals
- How often you should be cleaning based on how much traffic your room gets
- A troubleshooting guide for dealing with those pesky streaks and haze
- How to clean up after a renovation so your floors end up looking showroom-fresh

The nitty-gritty on Porcelain Tile – Why You Need to Get Cleaning Just Right
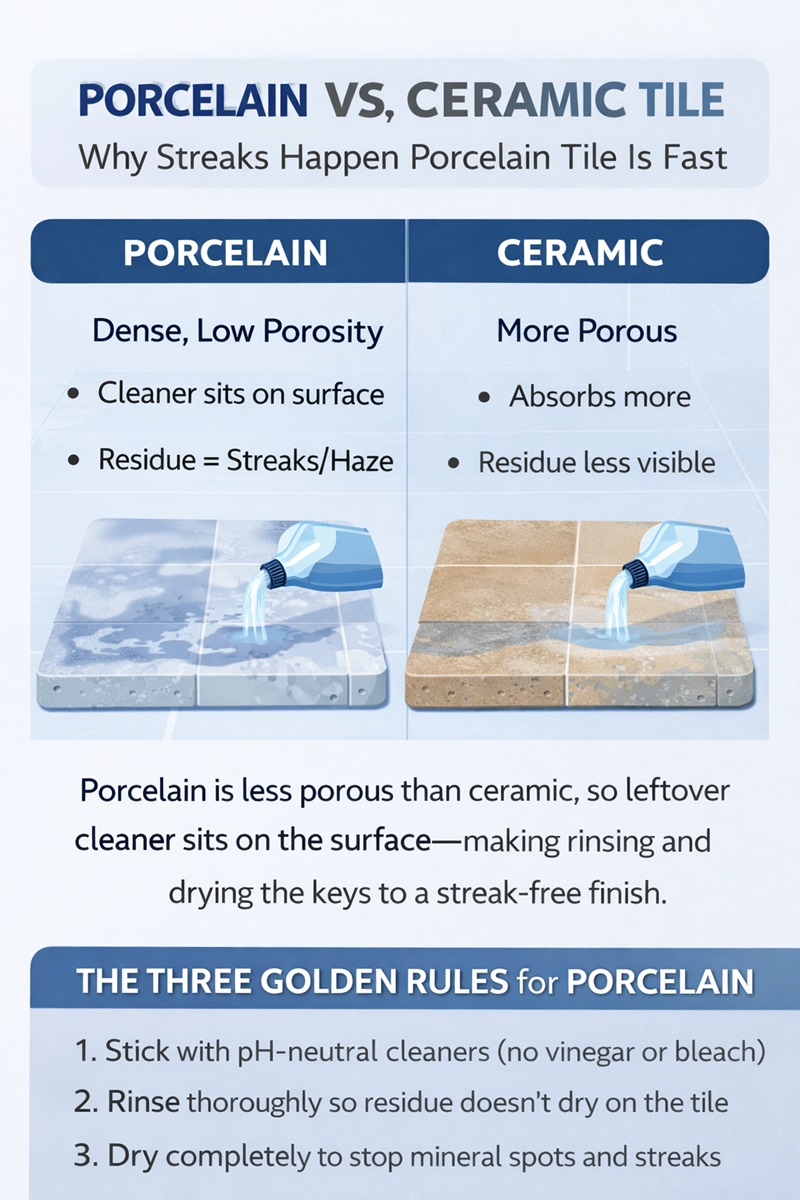
Porcelain tile is a type of ceramic tile made from refined clay and minerals, but with one big difference – it’s been fired in a super-high temperature oven (we’re talking 2,400 degrees Fahrenheit here) – which makes it super hard, super dense and less porous than your average ceramic tile. And that’s why it’s so good at resisting water, stains and all the foot traffic you can throw at it.
But that same density also makes it a bit of a diva when it comes to cleaning – anything you put on the tile stays on the tile, and all that smoothness on gloss and satin finishes just means any tiny bit of leftover cleaner will show up big time as a streak or haze.
Here’s what makes porcelain tile really different:
After a decade of cleaning and maintaining all sorts of porcelain tile in homes and offices, I’ve learned that it’s not about throwing more chemicals at the problem – it’s about having the right technique. Because porcelain tile is non-porous, any old cleaner just sits there, leaving a residue that shows up big time.
The Three Golden Rules for Keeping Your Porcelain Tile Streak-Free
- Stick with pH-neutral cleaners that won’t etch the surface or react with the tile
- Give it a really good rinse to get all the cleaning solution out
- Dry the whole thing properly to stop water spots and mineral deposits from forming
You don’t need to go all aggressive with scrubbing or harsh chemicals to keep your porcelain tile looking its best – gentle cleaning, a good rinse and a proper dry will keep it looking brand new for decades to come.
Why Standard Cleaning Methods Fail on Porcelain Tile
Lots of homeowners figure porcelain tile is basically indestructible because it’s made at such high temperatures. This means they go to town with vinegar, bleach, scrubbers, or commercial polishes. And all those heavy-handed tactics catch up with them in the long run.
Common mistakes and what they do to your tile:
- Streaky messes from not rinsing off the cleaner good enough
- Dull spots from getting vinegar or lemon juice on the same spot way too many times
- Cloudy film from all the soap and oily cleaning products that have built up
- Discolored grout from all that harsh scrubbing and bleach use
- Faded shine on your brightly polished tile from wax and polish products
The answer isn’t stronger cleaners – just use some common sense and realise porcelain tile actually just needs gentle regular cleaning with some good old-fashioned elbow grease – nothing more fancy than that.
Cleaning Porcelain Tile – The Right Way
The thing is, not all porcelain tile is created equal. You’ve got to clean yours with the right approach, depending on how shiny it is.
Polished Porcelain Tile – How To Deal With It
Characteristics: Its got a mirror-like finish that shows off every little smudge
Cleaning problems:
- Any streaks or water spots are super visible
- Fingerprint smudges are like neon signs saying “clean me”
- Any residue left over will ruin the finish straight away
Tips and Tricks:
- Keep your cleaner use to a minimum (less is definitely more)
- Rinse twice – once just isn’t enough
- Dry it immediately after cleaning to avoid streaks and water spots
- For a real high-gloss finish, buff it with a microfiber cloth to get rid of any imperfections
Matte or Satin Porcelain Tile – Its Own Set of Challenges
Characteristics: It’s got a soft sheen that isn’t as shiny as polished tile
Cleaning problems:
- It hides streaks a bit better but traps cooking grease like a pro
- If you don’t rinse regularly, you’ll get a buildup that’s almost invisible
- Using “shine” or “gloss” products will leave a greasy film behind
How To Clean Matte or Satin Tile:
- Regular rinsing is key to preventing build-up
- Don’t use any products that promise to add shine – just stick with what you’ve got
- Run your hand over the tile when it’s dry – if it feels sticky, you’ve got buildup
Textured or Anti-Slip Porcelain Tile – The Difficulty Lies In The Design
Characteristics: It’s got a raised surface with all sorts of nooks and crannies
Cleaning problems:
- Dirt can collect in all the grooves and valleys
- Just mopping won’t do the trick, you need to get a brush in there too
- It can look grimy even when it’s technically clean
Cleaning Tips For Textured Tile:
- Get all the loose dirt out with a good sweep or vacuum
- Use a soft-bristle brush to get into all the nooks and crannies
- Clean a bit more often than you would smooth tile
- A light brushing motion is all you need to get rid of grime in the grooves – no scrubbing required
Wood-Look Porcelain Tile – The Special Case
Characteristics: It’s got a wood grain texture that looks real to the eye
Cleaning problems:
- The grain lines can trap residue just like a real wood floor
- If you don’t clean out the recessed areas, you’ll get a cloudy appearance
- The texture makes it harder to notice streaks, but it makes buildup way worse
Cleaning Wood-Look Tile:
- Use a bit less cleaner than you think you need – overdoing it will make things worse
- Rinse and dry following the grain direction – it’s key
- Check the grain lines specifically for residue – they can hide it from you
- Cleaning Method by Tile Finish
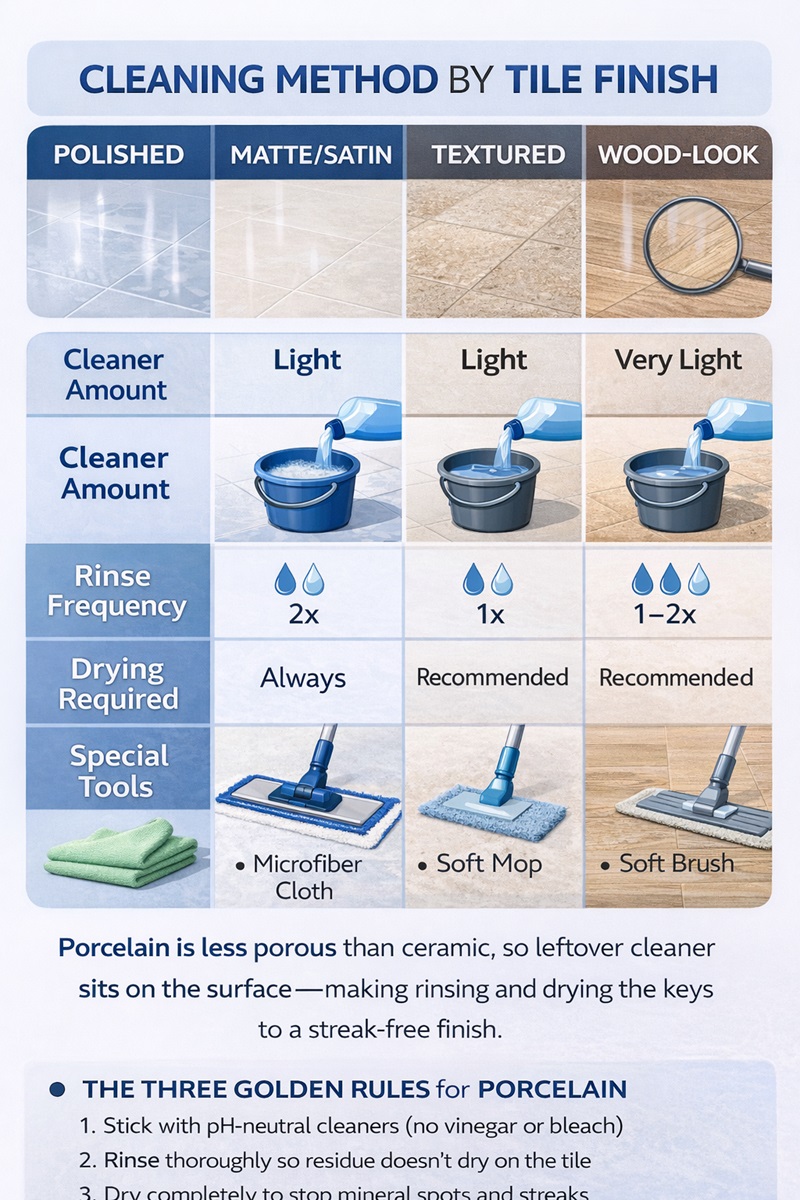
| Tile Finish | Cleaner Amount | Rinse Frequency | Drying Required | Special Tools |
| Polished | Minimal | 2x | Always | Microfiber cloth |
| Matte/Satin | Light | 1x | Recommended | Soft mop |
| Textured | Light | 1x | Recommended | Soft brush |
| Wood-Look | Very light | 1-2x | Always | Follow grain pattern |
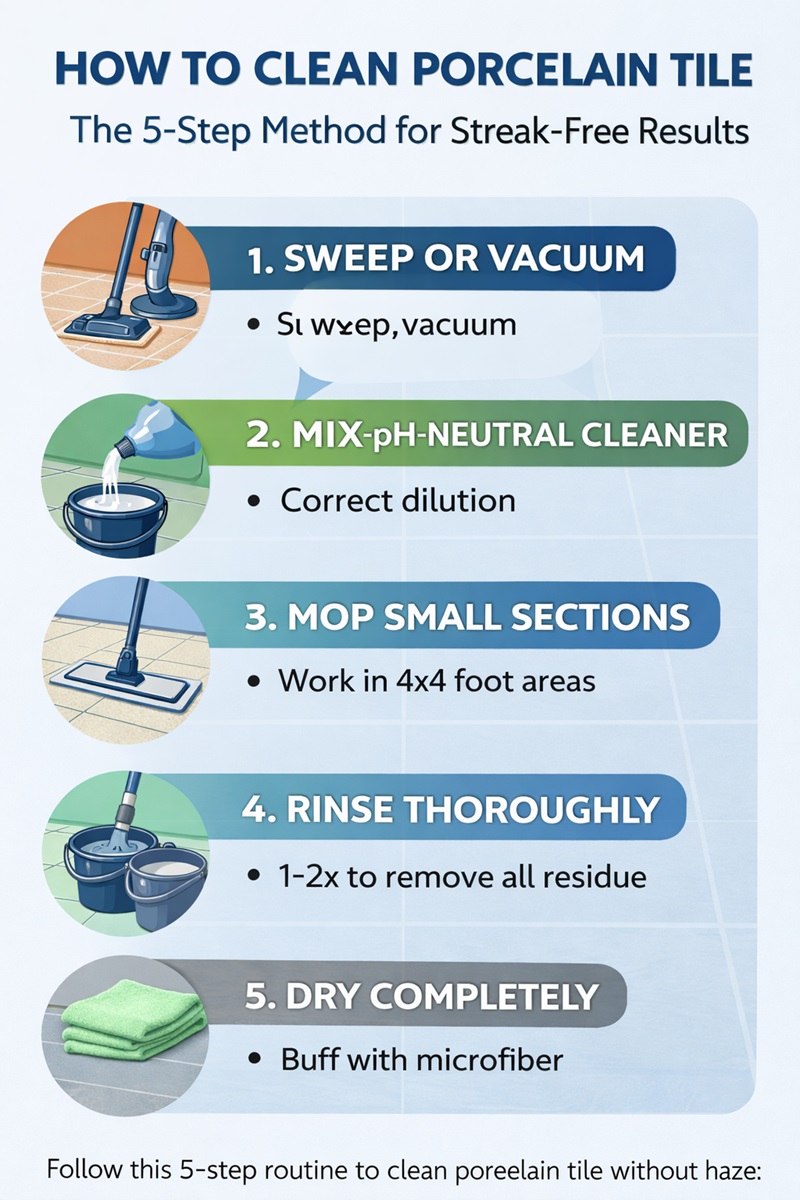
How to Clean Porcelain Tile Floors: The 5-Step Method
This is the exact method I use and recommend for cleaning porcelain tile floors without streaks. It works on all finish types and prevents the common problems most people face.
Time needed: 15-20 minutes for average room (150 sq ft)
Difficulty level: Beginner-friendly
What You’ll Need
Essential supplies:
- Soft microfiber mop or chamois mop
- Two buckets (one for cleaning solution, one for rinse water)
- Warm water (not hot—can leave mineral deposits)
- pH-neutral tile cleaner
- Soft-bristle brush (for grout lines)
- Dry microfiber towels (at least 2)
- Vacuum or broom
Tools That Damage Porcelain Tile—Avoid These:
| Don’t Use | Why It’s Harmful | Alternative |
| Vinegar or lemon juice | Acid dulls finish over time | pH-neutral cleaner |
| Steel wool or rough pads | Creates microscopic scratches | Soft brush or cloth |
| Oil-based soaps | Leaves sticky residue film | Water-based tile cleaner |
| Wax or polish products | Builds up, traps dirt | Nothing—tile has built-in finish |
| Bleach (regularly) | Weakens grout, discolors | Hydrogen peroxide for stains |
| Steam mop on new grout | Can damage uncured grout seal | Wait 72 hours after grouting |
Step 1. Clear Out Any Loose Dirt (5 minutes)
Give your floor a good sweep or vacuum – it’s a must before you even think about mopping. That’s because grit and sand in the dirt are basically sandpaper in disguise. They’ll leave tiny scratches you won’t notice at first, but down the line they’ll dull your floor finish.
Pro tip: If you’ve got a vacuum, use it – it’s way better than a broom for picking up fine dust that just gets shifted around instead of removed. Don’t forget to pay attention to corners and edges where dirt tends to pile up.
Step 2. Get Your Cleaning Solution Right (2 minutes)
Start by filling one bucket with warm water – and then add your pH-neutral tile cleaner as the label says to. The thing most people get wrong is putting in too much product
The importance of dilution
- Most cleaners need only a tablespoon or two of cleaner per gallon of water – that’s it
- Adding more doesn’t make it cleaner, it just adds more residue you’ll have to deal with later
- If you’re not sure how much to use, start with less and you can always add more if needed
Fill another bucket with plain warm water for rinsing.
How Much Cleaner Do You Really Need?
Room size calculator:
- Small bathroom (50 sq ft): use about half a gallon of solution
- Average bedroom (150 sq ft): 1 gallon
- Large kitchen (300 sq ft): 2 gallons
- Open floor plan (500+ sq ft): change the water every 200 sq ft or so
Step 3. Mop in Bite-Sized Chunks (10-15 minutes)
Dip your mop in the cleaning solution, wring it out so it’s just damp – don’t go too wet or you’ll get streaks and damage your grout lines.
Work in 4×4 foot sections so the cleaner doesn’t dry on the floor before you can rinse it off – this is especially important for polished porcelain tile in warm rooms.
Mopping like a pro:
- Use that S-pattern or figure-8 motion to get the whole area
- Don’t go back over what you’ve already cleaned
- Move your furniture as you go (you don’t want to skip underneath)
- For textured tile use a gentle circular motion to get right into those surface grooves
Step 4. Get Rid of All That Cleaning Solution (5 minutes)
This is the step most people miss, which is why they end up with streaks – you’ve got to rinse your mop in that second bucket of clean water (or use a separate clean mop), wring it out, and then go over the same section again to get rid of all that cleaning solution residue.
Rinsing tips:
- Change the rinse water if it gets cloudy
- For polished tile, you might need to rinse twice to get it right
- The floor should feel squeaky clean, not slippery or sticky at all
- If you feel any slickness, rinse again!
Step 5. Dry the Floor Thoroughly (3-5 minutes)
Use some dry microfiber towels to buff the floor dry – this gets rid of water spots from tap water minerals and any remaining streaks.
Drying like a pro:
- Work in the same sections you cleaned
- Use a clean, dry towel (flip to the other side as you go)
- For bigger areas, use a clean dry mop with a microfiber pad
- Polished tile needs a complete dry – matte can air-dry a bit
How to Clean Porcelain Tile Walls in the Kitchen and Bathroom
Porcelain tile walls pick up different kinds of dirt depending on whether you’re in the kitchen or the bathroom – so how you go about cleaning them can be a bit different.
Kitchen Wall Tile Cleaning
Troubles you’ll usually run into: Greasy splatters from cooking, oil mist from roasting, and left over food bits.
Do this:
- Start from the top and work your way down so any drips don’t ruin areas you’ve already cleaned.
- Use some warm water with a pH-neutral cleaner on a microfiber cloth – a good all-around combo.
- For grease, just wipe in small circles with the cloth – and don’t be shy about rinsing the cloth frequently in clean water.
- Dry the area with a separate (and clean) cloth.
- If the grease is super tough, you can add 1 tablespoon of dish soap to a quart of water and use that.
Save yourself some time: Clean your kitchen tile walls at least once a week to stop grease from building up – once it hardens, it’s a real pain to get off.
Cleaning Porcelain Tile in the Bathroom
The usual suspects: Soap scum, shampoo residue, deposits from hard water, and yucky mold in the grout.
Method:
- For vertical surfaces, a spray bottle is easier to get to than a bucket.
- Mix up your cleaning solution in the spray bottle (don’t spray that commercial stuff straight onto the tile – it’s not worth the risk).
- Spray a section at a time, wait 30 seconds, then wipe it down with a soft cloth.
- For soap scum, you might need to get a bit more aggressive with a soft brush in small circles.
- Rinse everything thoroughly with clean water on a cloth.
- Get rid of excess water with a squeegee or let the area air-dry completely so it doesn’t leave those unsightly water spots.
Doing some daily maintenance: After you use the shower, give those walls a good squeegee – this’ll stop about 90% of the soap scum and mineral deposits from building up.
Removing Hard Water Spots on Bathroom Tile
If you get those pesky mineral deposits or hard water stains:
- Mix equal parts water and white vinegar (only use this combo for an occasional spot treatment, not for regular cleaning).
- Apply the solution to the spot, then wait five minutes max.
- Wipe it all clean with a soft cloth.
- Rinse the area really thoroughly with plain old water.
- Dry it completely.
- Don’t do this more than once a month or it won’t do any good.
How to Clean Porcelain Tile Without Leaving Streaks (And Some Advanced Tricks)
Streaks aren’t caused by dirt, they’re actually because of the residue that gets left behind. Knowing this helps you tackle the problem in a whole different way.
What really causes streaks
Too much cleaning product: Think about it – more cleaner doesn’t necessarily mean cleaner tile. Excess product can’t be rinsed away completely, so it leaves behind a film that catches the light (and looks like streaks).
Not rinsing enough: Even pH-neutral cleaners can leave residue if you don’t rinse properly. And if you just give it one quick rinse, that’s usually not enough. And if the rinse water is dirty, it redeposits the grime.
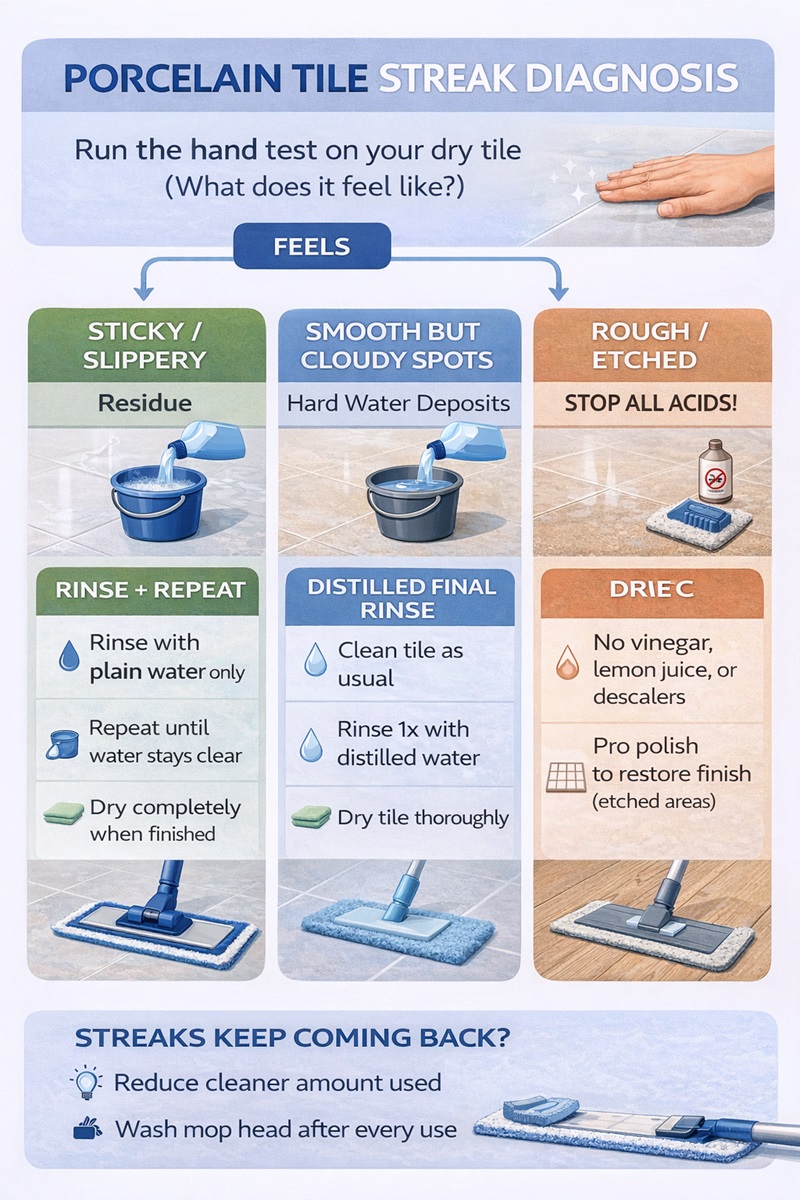
Using dirty mop heads: Old mop heads get loaded with bacteria and grime – and they spread it around instead of getting rid of it. Should get washed after every use, ideally.
Air-drying instead of hand-drying: When water evaporates, it leaves behind mineral deposits – which can look like spots. Especially bad with hard water on dark tile.
All about hard water mineral deposits: It’s the calcium and magnesium in your tap water that cause these white or cloudy spots to form as water evaporates.
Fixing Existing Streaks on Porcelain Tile
If you’re stuck with streaks or haze on your porcelain tile its not a disaster – but you do need to get to work pronto.
Method 1: Rinsing Like a Pro
- Give it a good old mop with just plain warm water and no cleaning solution
- Rinse that mop out in fresh water as often as you need to
- Change the water when it starts to get cloudy
- Keep on rinsing till the water stays clear
- Give it a good dry afterwards
Method 2: The Distilled Water Trick (for areas with hard water)
- Get the tile clean with a pH-neutral cleaner
- Rinse it off with some tap water
- Give it a final rinse using some good quality distilled water
- Dry it as soon as you can
Method 3: Calling in the Professionals (for really stubborn buildup)
- Use a dedicated porcelain tile streak remover specifically designed to get rid of the tough stuff
- Follow the instructions to the letter – don’t even think about trying to wing it
- Rinse it a few times to make sure every last bit is gone
- Give it a good drying after that
Test Time: A properly cleaned porcelain tile surface should feel super smooth to the touch (not sticky, or slippery or rough in any way)
If it still feels like there’s something on it, then you know there’s still some residue hanging around
Cleaning Porcelain Tile Grout Safely – So You Don’t Ruin It
Grout is a whole different story to porcelain tile – its way more porous so its going to stain a lot faster and it needs a different cleaning approach altogether. What this means is that the same chemicals which won’t harm the tile can still ruin or discolour the grout.
Routine Grout Cleaning (Weekly to Monthly)
The Essentials:
- Warm water
- pH-neutral cleaner ( same one you use for tile)
- A soft-bristle brush – an old toothbrush will do
- A clean cloth to wipe everything down
How to Do It:
- Just apply the cleaner to the grout lines and let it sit for a bit (2-3 minutes will do – don’t leave it on for too long)
- Use that soft brush to gently scrub the grout
- Don’t scrub too hard – it’ll just push the dirt in deeper
- Rinse it off good and proper with some clean water
- Give it a quick dry if you can
Important Note: Don’t forget – hard scrubbing can actually damage the grout even more – it will make it more porous and that just makes it stain even faster
Deep Grout Cleaning (Every 2-3 Months)
And then there are the times when routine cleaning just isn’t enough and you need something a bit more serious. For stained grout or the kind of dullness that nothing seems to shift:
The Baking Soda Paste
- Mix up some baking soda with a bit of water to get a thick paste going
- Just apply it to the grout lines alone – leave the tile out of it
- Let it sit for a good 10 minutes
- Gently scrub with that soft brush
- Rinse it good and proper
- Dry it completely
Hydrogen Peroxide – For White Grout Only:
- Mix equal parts hydrogen peroxide and water (3% solution only)
- Apply to the grout lines and let it sit for 10 minutes
- Scrub it gently with that soft brush
- Rinse really thoroughly (we’re talking super-dry as a matter of fact)
- Dry completely
Sealing Grout – What You Need to Know:
For Grout with Sealant:
- Just remember not to use harsh chemicals that’ll strip the sealant
- Test any new product on a small area first to make sure it wont cause any problems
- You’ll need to reseal every 1-2 years depending on how much traffic the area gets
- Warning signs that the sealant is going: grout darkens when its wet, stains easily
For Grout without Sealant:
- its way more prone to staining
- will need more frequent cleaning
- Its worth considering getting a professional in to seal it for you
- Clean up spills straight away so they dont have a chance to sink in
The Best Porcelain Tile Cleaners (USA 2026)
Using the right cleaner is way more important than just knocking out dirt with a strong one. We’ve put together a list of the best products that have proven themselves to be effective at cleaning porcelain tile without leaving behind any pesky residue or damaging the finish.
The Top 5 Recommended Cleaners For You
- Bona Hard-Surface Floor Cleaner
- Price: $18 to $35 (32-128 oz) – and trust me, you get what you pay for here
- Great for: Keeping your floors and walls looking fantastic on a weekly basis
- Why it works so well: It’s pH-neutral, rinses clean and leaves zero residue behind
- Coverage: That big 128 oz bottle of theirs will easily cover about 4,000 square feet
- Where to grab it: You can find it at Home Depot, Amazon, or even Walmart
- Check the current price → – you might be surprised.
- Better Life Natural Floor Cleaner
- Price: $16 to $32 (32-64 oz)
- Best for: Homeowners with pets, kids or even those that are super sensitive to chemicals
- Why it’s so effective: It’s plant-based, non toxic and even works great on grease
- Coverage: That 32 oz bottle will handle about 1,000 sq ft no problem
- Scent: It’s got a light mint and tea tree thing going on – nice and refreshing
- Check the current price →
- Black Diamond Stoneworks Ultimate Grout Cleaner
- Price: $22 to $28 (32 oz) – a bit pricier but so worth it
- Best for: Just getting into the grout lines – and yes, safe to use on porcelain as well
- Why it’s so effective: It’s acid-free, gets deep into grout without messing with the tile
- Application: Spray bottle, no mixing required – easy peasy
- Result time: You should be able to see some serious dirt getting cleaned out within 3-5 minutes
- Check the current price →
- Zep Neutral pH Floor Cleaner
- Price: $24 to $48 (128 oz concentrate) – sure you’ll need to mix it up yourself but trust me it’s worth it
- Great for: Commercial spaces, high-traffic zones, large areas – you get the idea
- Why it works so well: Professional-grade, totally effective for deep cleans and then some
- Coverage: Makes a whole lot of cleaning solution – up to 64 gallons of it to be exact
- Dilution: Just 2 oz per gallon of water and you’re good to go
- Check the current price → – might be pricey but it lasts a while.
- Method Squirt + Mop Hard Floor Cleaner
- Price: $8 to $14 (25 oz)
- Great for: Quick cleanups between those deeper deep cleans
- Why it works so well: No-rinse formula (though I still think a quick rinse is a good idea for polished tile)
- Convenience: Nice almond scent, totally biodegradable – plus super easy to use
- Note: Don’t go thinking this thing is a miracle worker, especially on polished tile – a rinse is still warranted
- Check the current price →
Specialty Products – Don’t Forget About These
Post-Renovation Haze:
- Aqua Mix Cement Grout Haze Remover ($18-$25) – only use for that gross haze from building work, not regular cleaning
Mold/Mildew on Grout:
- RMR-86 Instant Mold Stain Remover ($15-$22) – be sure to spray on the grout only and rinse the tile right away
Hard Water Deposits:
- CLR Calcium Lime Rust Remover ($8-$15) – just mix with water, use sparingly and have a bucket ready for all the water you’ll need to rinse
Products to Avoid At All Costs
⚠️ Pine-Sol, or any oil-based cleaner – those will stick to the tile like glue
⚠️ Rejuvenate or those so-called “restorer” products – they just leave a waxy build-up on the tile
⚠️ Mr. Clean Magic Eraser – too harsh, can scratch up even the sturdiest tiles
⚠️ Swiffer WetJet solution – leaves a nasty film on porcelain
⚠️ Bleach – far too harsh for regular use on tile (OR grout)
⚠️ Ammonia-based cleaners – completely unnecessary and could end up causing more harm than good
⚠️ Any product that says “wax”, “polish” or “shine boost” – porcelain doesn’t need those – trust me.
How Often Should You Clean Your Porcelain Tile?
How often to clean porcelain tile depends on a few factors – how much foot traffic it gets, how its used and of course whether its a floor tile or a wall tile for example. Heres some guidance on what to aim for with a maintenance schedule that works in real life.
Recommended Cleaning Schedule
| Area Type | Sweep/Vacuum | Mop/Clean | Deep Clean | Notes |
| Kitchen floors | Daily | Weekly | Monthly | High grease exposure |
| Bathroom floors | 2-3x/week | Weekly | Monthly | High moisture, soap residue |
| Entryway floors | Daily | 2x/week | Monthly | Outdoor dirt, salt in winter |
| Living room floors (high traffic) | Daily | Weekly | Every 2 months | Less dirt than kitchen |
| Bedroom floors (low traffic) | 2-3x/week | Every 2 weeks | Every 3 months | Minimal soil |
| Shower walls | Daily squeegee | Weekly | Monthly | Prevent soap scum buildup |
| Kitchen backsplash | As needed | Weekly | Monthly | Grease splatters |
| Commercial spaces | 2x daily | Daily | Weekly | Heavy traffic requires more |
The Changing Needs of Your Tiles
Winter – The Muddy Season (Dec – Feb)
- Entryways need a bit more TLC – daily, or at the very least 3 or 4 times a week\
- Salt and de-icer on your shoes can be super corrosive to the tile – make sure to rinse the floors really well to get rid of all that chemical gunk\
- Those pesky winter mats can really help keep the dirt and grime at bay – place one at every entrance and you’ll be glad you did
Spring – Time to Shake Off the Winter Grime (Mar – May)
- After a long winter, nows a good time to give your tile a good deep clean to get rid of all the dirt and grime that built up\
- Pollen and other outdoor allergens are now out in force so you might want to give your place a good airing out\
- If your grout is looking a bit worse for wear, this is a good time to reseal it
Summer – The Busy Season (Jun – Aug)
- With the school holidays, you can bet your house is going to get a lot more foot traffic than usual\
- Grass and dirt gets tracked into the house much more easily so you might want to double clean the kitchen and entryways\
- At the very least, aim to clean the kitchen floors at least twice a week
Fall – Get Ready for the Next Winter (Sep – Nov)
- Get ahead of the game and do a good deep clean of all your tile to get rid of any winter grime that may have built up\
- Take stock of your grout and give it a good check-over – you dont want to be caught out with bad grout when wet winter weather rolls around\
- Make sure to clean up any leaves and outdoor debris that gets tracked into the house
When You Need to Clean Right Away
Clean your tile straight away if:
- You can literally see the dirt and grime on the floor when you walk across it\
- Its starting to feel sticky underfoot\
- The tile is looking dull and losing its shine\
- Youve got visible spills or stains\
- Its got that nasty unpleasant odour
- And if your grout lines are starting to get all dark and discoloured… well, its pretty clear thats a cleaning job waiting to happen
Troubleshooting Common Porcelain Tile Problems
Even when you know the proper way to clean porcelain tile, problems can still pop up. Here’s how to identify and fix the most common complaints.
Problem 1: Streaks Won’t Quit
The symptoms are pretty straightforward: visible lines or marks that keep showing up after cleaning
Figuring out the problem:
- Run your hand over the dry tile
- If it feels like glass and leaves your hand feeling all sticky or slippery = you’ve got leftover cleaning product residue
- If it feels smooth as silk = it’s probably hard water mineral deposits building up
- if it feels a bit rough to the touch = that’s probably actual etching from acid damage
What to do:
For that pesky cleaning product residue:
- Just use plain warm water to mop it up\
- Rinse 2 or 3 times with fresh water each time\
- Dry the tile thoroughly with a microfiber cloth – you don’t want any water spots\
- Repeat the process until it feels smooth
For those hard water minerals:\
- Do a final rinse with distilled water\
- Dry the tile right away\
- If you’re getting a lot of mineral buildup – think about getting a water softener to fix the problem\
- If you notice spots forming on the walls – grab a squeegee to prevent them from coming back
For acid damage (which is a permanent problem, and not just dirt):\
- This is a problem with the finish on the tile – it’s not something you can easily fix on your own\
- You may need to get a professional to come in and polish the tile (only works on polished tile, though)\
- To prevent further damage, make sure you’re not using any acidic cleaners\
- If you’re having trouble getting rid of mineral spots or soap scum buildup – you might want to think about calling in a tile restoration expert
Problem 2: Your Tile Looks Dull or Hazy
The symptoms are pretty easy to spot: the tile looks cloudy, not shiny, or has a white film on it
What’s going on:
- Soap scum accumulated over months because of bad rinsing habits\
- Some kind of wax or polish was applied to the tile at some point\
- Hard water mineral buildup\
- Grout haze from a recent installation
Do this:
For soap scum buildup:
- Use a dedicated soap scum remover – follow the instructions to the letter
- Use a soft brush to gently scrub the affected area
- Rinse the tile thoroughly at least 3-4 times
- Dry it completely
- Get back on track with your regular cleaning routine – this time make sure to rinse the tile well
For wax or polish buildup:
- Use a commercial wax stripper that’s safe for porcelain
- Follow the product’s instructions carefully
- You may need to do this a few times
- Rinse it thoroughly
- Never, ever apply wax or polish to porcelain tile again
For grout haze (which usually happens right after installation):
- Use a specialized grout haze remover that’s designed for porcelain tile
- Follow the instructions on the product (usually 5-10 minutes)
- Scrub the area with a white nylon pad
- Rinse the tile very thoroughly
- If the haze doesn’t come off after the first try – you might need to do it again
Problem 3: Grout is Discolored
This is the symptoms you’re seeing: the grout is darker, stained, or uneven in color
What might be going on:
- Just normal dirt and grime buildup from use
- Mold or mildew growth (especially in bathrooms)
- Sealer failure (which lets dirt and stains get in)
- Using colored cleaning solutions on your grout
- Scrubbing too hard and taking off the surface layer
Do this:
For dirt and grime:
- Mix up a baking soda paste
- Gently scrub the area with a soft brush
- Rinse the grout thoroughly
- If you want to add an extra layer of protection – think about sealing the grout
For mold or mildew:
- Spritz some hydrogen peroxide onto the affected areas
- Let it sit for 15 minutes
- Gently scrub the area with a soft brush
- Rinse the grout thoroughly
- Make sure you’ve got good ventilation in your bathroom – this can help prevent mold and mildew from coming back
- If the mold is being particularly stubborn – you might need to use a specialized mold remover
For permanent stains:
- If the stain doesn’t come out with regular cleaning – it might be there to stay\
- You’ve got a few options: you can use grout paint or colorant, replace the grout entirely, or hire a professional to do a restoration\
- To prevent this from happening again in the future – make sure to seal your grout.
Problem 4: Textured Tiles Looking Grubby Despite a Good Cleaning
What’s going on: Grooves in the tiles are still looking a bit grimy even after mopping
Why: Dirt has somehow managed to get stuck in the texture and mopping just isn’t getting it out
Fix it:
- Get out the vacuum first and give the floor a really good going over before you do any wet cleaning
- Grab a soft-bristle brush and go over the tiles with some gentle circular motions
- Use a bit of light pressure and apply it directly into the grooves to really dig in and get rid of the dirt
- Then give the tiles a good rinse to make sure you get all that loosened up dirt out of there
- You might need to clean your textured tiles a bit more often to keep them looking their best
Problem 5: Tiles are Slippery After a Clean
Symptoms: Your floor is super slippery when you walk on it
What’s going on: This one’s all about residue – you’re probably using too much cleaning product – not that the floor is too clean
How to fix it:
- First off, cut back on the amount of cleaner you’re using – try reducing it by half
- Make sure to give the floor a good few rinses with some clean water to get all that excess cleaner out of there
- And don’t forget to dry the tiles properly too
- Actually, it’s just a fact – a properly cleaned tile should never feel slippery underfoot
Problem 6: Scratches are Popping Up Everywhere
What’s going on: You’re noticing some fine lines or marks that weren’t there before
Why it’s happening: Well, it could be because some grit on the floor is acting as a sort of sandpaper during mopping, or maybe you’ve been using an abrasive cleaning pad or brush, or perhaps something heavy’s been dragged across the floor, or even the pet’s nail has done some damage
How to keep it from happening in the future:
- Always get the floor vacuumed or swept before you even think about mopping
- Stick to using soft mops and cloths – it’s just safer for the tiles
- Put some felt pads under the legs of any heavy furniture
- Make sure to trim the pet’s nails regularly to keep them from causing damage
- Use rugs in high-traffic areas to cut down on the amount of wear and tear on the tiles
Note: If you see some fine scratches and it’s not entirely clear if they’re actual damage or just leftover residue, do a thorough clean first before assuming the worst.
How to Get That Porcelain Tile Looking Good After a Renovation or Installation
As anyone who’s ever installed porcelain tile can tell you, it often looks a whole lot worse before it looks better. You’re left with a mess of construction dust, grout haze, adhesive residue and paint splatters – all of which need to be tackled carefully, not thrown at with some aggressive scrubbing.
Timeline: plan on giving your new tile some TLC over the next 3-7 days
Stage 1: Dry Sweep (Day 1)
First off: get all that loose construction debris out of the way before you even think about introducing any water
- Get out the vacuum with the brush attachment and give the whole area a good once-over\
- Don’t even think about using water yet – it’ll just turn the dust into mud and make a paste that’s even harder to get rid of\
- Remove all visible debris, tape, labels – the works\
- Break out the dry microfiber cloths to get rid of any dust or dirt that’s hiding in the nooks and crannies\
- Don’t forget to vacuum those grout lines in particular
Why bother?: mixing dust with water is just going to make a bigger mess for you to deal with later on
Stage 2: First Gentle Cleaning (Day 2-3)
Goal: get most of the dirt off the surface without messing with the grout haze just yet
- Grab some warm water and a pH-neutral cleaner that’s not going to damage your grout\
- Break the area down into smaller sections (4×4 feet or thereabouts)\
- Mop the tile with a damp (not wet) mop\
- Rinse with clean water and make sure you dry it thoroughly\
- Take a step back and have a look for any issues that are still lurking\
- One more thing: if the grout is still wet (less than 3 days old) you’ll need to stick to plain water only – no cleaners, no steam
Grout curing note: if that’s the case, play it safe and just use water
Stage 3: Getting Rid of Grout Haze (Day 3-5)
What even is grout haze?: it’s that cloudy white film that shows up on the tile surface when the grout dries. It looks like a thin layer of cement that’s been left behind.
Method:
- Get your hands on a commercial grout haze remover designed for porcelain – Aqua Mix is a good one to look into\
- Make sure you read the instructions – they’re different for every product\
- Follow the instructions and apply it to the affected areas, wait for the specified time (usually 5-10 minutes)\
- Use a white nylon pad to gently scrub the area\
- Rinse right away and get it dry\
- Take another look under good lighting and repeat as necessary
Important warnings: don’t let the remover dry on the tile – ventilate the area – keep off the grout as much as you can – and for goodness sake – don’t use it on grout that’s less than 7 days old
Stage 4: Taking Care of Stubborn Residue (Day 5-7)
Goal: get rid of paint, adhesive or any other pesky materials that are still hanging around
For paint splatters:
- Get out a plastic razor blade scraper and use it at a 45-degree angle\
- Don’t use a metal blade on porcelain – it’ll scratch it\
- Apply a bit of pressure and let the tool do the work\
- Wipe the residue with a damp cloth\
- For paint that’s particularly stubborn, try using denatured alcohol on a cloth
For adhesive residue:
- Apply some mineral spirits to a cloth (not directly on the tile)\
- Rub it gently until the adhesive softens\
- Wipe it clean right away\
- Wash the area with soap and water\
- Rinse thoroughly
For caulk residue:
- Use a plastic scraper to remove as much of the bulk as you can\
- Then, get some mineral spirits on a cloth and use it to get rid of the remaining film\
- Clean it up with soap and water\
- Rinse it thoroughly
Stage 5: Final Rinse and Inspection (Day 7)
Goal: get rid of any remaining cleaning product residue and double-check that your tile is good as new
- Get out a mop and some plain warm water\
- Rinse the mop frequently and change the water when it gets cloudy\
- Dry it thoroughly with some microfiber towels\
- Give it a good once-over under bright light from a few different angles\
- Check for any remaining haze, streaks or spots – and make sure to take care of those last little bits
Post-Renovation Cleaning: the mistakes to avoid
❌ Don’t bother with acidic cleaners even if the manufacturer says they’re safe for grout haze – just don’t use them ❌ No steam cleaners on grout that’s less than 2 weeks old – it’ll be too fragile ❌ Don’t get too aggressive with scrubbing – you’ll be lifting that grout right off the tile ❌ Don’t even think about using bleach on new grout – it’ll mess with the color and weaken the seal ❌ Don’t rush – you’ll only make a mess with one big clean – gentle cleanings are the way to go
When you should probably call a professional
Think about getting a tile cleaner in if:
- Those grout haze removers aren’t working after 3 tries\
- You notice you’ve actually damaged the tile or the grout\
- You’ve got a huge commercial installation (over 1,000 sq ft is a big job)\
- You’ve got special tile that’s either super valuable or really delicate\
- You’re still dealing with issues from a new installation like grout that’s all uneven, or just won’t go away – stubborn construction residue, or maybe the clean-up from when the tile was first installed just wasn’t done right
Now – you don’t need a pro for porcelain tile, but if you do run into some problems – they can definitely help prevent long-term damage.
Keeping Your Porcelain Tile Looking New for years
Getting the grout and tile looking clean might solve your immediate problems like streaks and haze – but to keep it looking good long-term you need to be doing a few simple things to prevent all that gunk building up in the first place
Simple things you should be doing on a daily and weekly basis
- Get some door mats or rugs at your exterior doors to stop all that grit and sand getting tracked in – that’s what really causes micro-scratches on your tiles\
- Vacuum or just grab your mop any time there’s high traffic – it’s a quick way to clear up all those abrasive particles\
- Wipe up spills right away – especially if it’s something like oil, sauce or something acidic\
- Use a squeegee to wipe down your shower walls after you’re done – it keeps mineral deposits and soap scum from building up
Monthly check-ups to keep your tile and grout in good nick
- Take a good look at your grout lines for any discoloration or moisture darkening – it’s better to catch it early\
- Run your hand across the tile – if it’s tacky it means there’s residue building up\
- Just rinse your floors with plain water – it’s a good way to get rid of all the loose cleaner gunk
The things that really ruin your tile in the long run
- All that acid exposure (so no vinegar or citrus, and definitely avoid those harsh descalers)\
- Using wax or polish or any of those fake shine-restoring products\
- Reusing your mop head without washing it – that’s just a recipe for disaster\
- Not rinsing the floor properly – letting water dry on the surface isn’t good for it
Porcelain tile is pretty durable, but all that gunk and the wrong products can make it look older than it needs to – so keep an eye out for those things.
Frequently Asked Questions (FAQ)
Can I use vinegar on porcelain tile?
Yes – but only if you’re going to use it just occasionally to spot clean a stain, not every time you clean. Repeatedly exposing porcelain tile to acid, even in the form of vinegar, can dull the finish and weaken the grout over time. If you’re looking for a reliable cleaner, pH-neutral products are generally safer and more effective.
Is steam cleaning safe for porcelain tile?
Steam is generally okay for the tile itself, but be careful with fresh or unsealed grout because it can degrade the sealer. If you’re really going to steam clean your tile, try to do it sparingly and not within two weeks of laying the grout.
Why does my porcelain tile look cloudy after cleaning?
Chances are, cloudiness is just a sign of leftover cleaner or scum rather than a sign that you’ve genuinely damaged the tile. A few common causes are:
- Using too much cleaner\
- Not giving the tile a good rinse afterwards\
- Hard water leaving mineral deposits
A plain water rinse followed by a good hand drying should usually clear up the issue.
Do I need to seal porcelain tile?
No, you don’t. Porcelain tile has a very low porosity level and doesn’t need any kind of sealing. However, the grout around the tiles is often porous and can benefit from being sealed every 1-2 years depending on how much foot traffic and moisture the area gets.
Can porcelain tile be polished if it’s dull?
Oh, only if the surface of the tile has actually been damaged in some way. And even then, you’d be looking at a professional process to polish it. In a lot of cases, though – especially in homes – dullness is just a sign of a residue buildup which can be cleared away with some basic rinsing and cleaning.
Is it normal for tile to feel slippery after cleaning?
No, not at all. If the tile is feeling slippery, it usually means you’ve left behind some residue from the cleaner. Properly cleaned porcelain tile should just feel clean and smooth – not like you’re walking on a soap bar.
Quick Reference: Porcelain Tile Cleaning Checklist – Remember This For Streak-Free Results Every Time!
Here’s a quick checklist to help you out with cleaning your porcelain tile:
Before you get started
- Make sure to vacuum or sweep the area properly\
- Get a clean mop head ready\
- Have two buckets and a sink full of clean water on hand
While you’re cleaning
- Use the absolute minimum amount of cleaner you need to get the job done\
- Break the area down into smaller sections and clean them one by one\
- Make sure to rinse each section with clean water as you go
After you’re done
- Get rid of any excess water with a microfiber towel\
- Do a quick touch test to make sure there’s no residue left behind\
- Change the water if it starts to cloud up
If you skip just one of these steps, you can bet your streaks and haze will be back in no time.
The Final Word On Cleaning Porcelain Tile: Less Product, Better Results
Porcelain tile is a seriously tough material – but its non-porous surface means that even small mistakes will be super visible. The best way to keep it looking its best isn’t by using aggressive chemicals or heavy scrubbing, though – it’s by:
- Using just the right amount of cleaner\
- Rinsing thoroughly afterwards\
- Getting all the excess water out so it doesn’t leave any streaky residue
Stick to these principles and your porcelain tile should look amazing for years to come – and you’ll be able to avoid all the fuss and bother of having to call in a professional to fix up a damage job.