
You never plan for a burst pipe, yet suddenly you are ankle-deep in water and wondering what to tackle first. Take a breath.
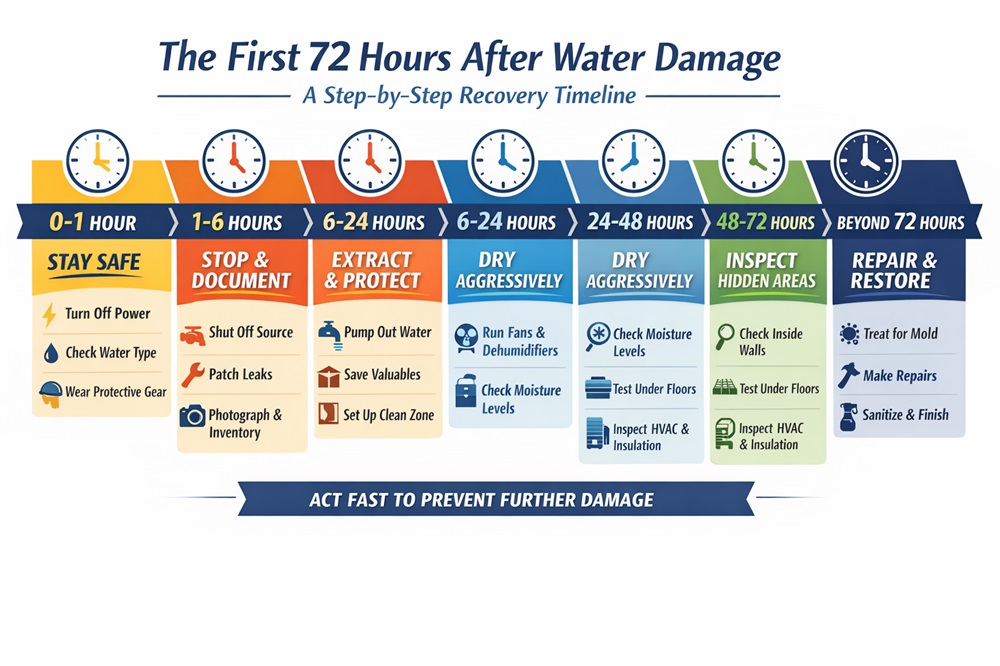
Get ready for step-by-step actions so you can immediately regain control of your space. From shutting off electricity to drying hidden cavities.
If you are in Sydney, the detailed procedures outlined by the Water Damage Specialist can serve as a handy benchmark.
Prioritize Personal Safety
When water suddenly invades a living space, the instinct is to sprint for towels. Instead, pause and focus on staying alive, uninjured, and contaminant-free.
Kill the Power First
Locate the main breaker, stand on a dry surface, switch electricity off, and remove the electrocution risk that often accompanies even shallow indoor flooding.
Gauge Water Cleanliness
Crystal-clear Category 1 water is far safer than sewage-laden Category 3. If the water is cloudy, smelly, or debris-filled, avoid contact and call professionals.
Suit Up Correctly
Sturdy boots, rubber gloves, goggles, and an N95 mask create a basic barrier against bacteria, fiberglass insulation, or sharp debris drifting in the water.
Decide Whether to Evacuate
If ceilings sag, floors buckle, or a rapid leak continues, take essential documents and everyone in the home and relocate until a structural inspection clears re-entry.
Stop Water Intrusion
Eliminating the source halts new damage and instantly lowers restoration costs, so hunt down every drip, gush, or seep before starting any cleanup or repair work.
- Shut off valves: Rotate the main supply handle clockwise to starve burst pipes or faulty appliances of water.
- Patch obvious holes: Apply pipe repair clamps or roof tarps to control flow until permanent fixes are made.
- Redirect rainwater: Place sandbags near low doors and extend downspouts to divert runoff away from foundations.
- Engage outside help: Plumbers, roofers, or a 24-hour restoration crew arrive with tools most homeowners lack, such as hydrostatic pumps and temporary roof shrink-wrap.
Verifying the leak is truly stopped prevents watching newly dried rooms refill and protects evidence your insurer needs for an accurate claim.
Document All Damage
Accurate records convert chaos into claim dollars, so begin photographing, filming, and logging the disaster before a single wet board or rug leaves the site.
Shoot Comprehensive Video
Slowly pan each room, capturing soaked drywall, warped flooring, damaged electronics, and visible waterlines.
Photograph Valuables Close-Up
Snap serial numbers, brand labels, and condition details of furniture, computers, and artwork to substantiate pre-loss value.
Create an Itemized Spreadsheet
List make, model, purchase date, and estimated replacement cost for every ruined belonging, attaching receipts where possible to speed reimbursement.
Store Receipts and Time Logs
Keep invoices for fans, pumps, hotel nights, and meals. Most policies cover reasonable mitigation expenses if you can present organized proof.
Consult Coverage Specifics
The Seawell Firm notes that sudden pipe breaks are usually covered while surface flooding often is not. Reading your policy fine print prevents surprise denials.
Extract Standing Water
Water that remains longer than 24 to 48 hours can warp subfloors, feed mold, and rot framing. Fast, thorough extraction often separates minor repairs from reconstruction.
- Rent or borrow pumps: Submersible units empty basements efficiently, and a wet-dry vacuum can finish shallow puddles.
- Work top to bottom: Start extraction on upper levels, then tackle lower floors to avoid gravity-fed reflooding.
- Mind electrical hazards: Keep cords elevated, use GFCI outlets, and never operate equipment in water touching live receptacles.
- Dispose responsibly: Direct gray or black water into sanitary sewer clean-outs, not storm drains, to avoid community contamination.
Removal and restoration are different steps. Drying and cleaning can begin only after every accessible gallon has been evacuated.
Move and Protect Belongings
Prevent secondary damage by relocating items that survived the initial rush. Quick action often separates a salvageable heirloom from an insurance write-off.
- Establish a clean zone: Choose a dry room or rented pod where inspected items stay protected while remediation continues elsewhere.
- Sort by material: Wood furniture, electronics, textiles, and paper each need different drying or cleaning methods.
- Use gentle handling: Wet fibers tear easily. Slide plastic under sofas, lift from sturdy frames, and support shelves so joints do not loosen.
- Photograph again: Quickly photographing relocated belongings preserves chain-of-custody proof, satisfying both insurers and professional cleaners.
Label every box, bag, or bin with room, item type, and moisture level so contractors, adjusters, and family members can locate possessions without rummaging.
Initiate Drying Process
With standing water gone and contents secured, shift focus to humidity reduction. Prompt evaporation halts mold spores, saves drywall, and keeps reconstruction costs reasonable.
Create Cross-Ventilation
Open opposite windows and doors, then position box fans to expel moist indoor air while drawing drier outdoor air across saturated surfaces.
Deploy Air Movers Strategically
Angle high-velocity fans several inches above flooring toward walls. Moving air shears moisture off materials faster than still air.
Set Industrial Dehumidifiers
Desiccant or refrigerant units continuously strip vapor from the air. Empty collection tanks or confirm hose drainage so machines run uninterrupted.
Monitor With Moisture Meters
Probe studs, drywall, and subfloor layers daily. Document readings to verify downward trends before closing walls.
Inspect for Hidden Moisture
Even after days of fans, concealed dampness can lurk inside cavities, fostering odors and mold. Systematic inspection prevents unpleasant surprises months later.
Check Wall Cavities
Remove baseboards and drill small inspection holes. Borescope cameras or infrared scanners reveal moisture invisible on freshly painted surfaces.
Lift Flooring Samples
Peel back corner carpet, laminate, or vinyl planks. Feel underlayment and subfloor, measuring moisture content to decide between continued drying or replacement.
Inspect Insulation
Wet fiberglass loses R-value and feeds mold. Saturated cellulose compacts irreversibly, so pull random batts to examine conditions.
Survey HVAC Ducts
Condensation often forms inside metal runs. If moisture readings remain elevated, schedule professional duct cleaning.
Treat and Prevent Mold
Mold spores can germinate within 24 hours, so prevention runs parallel to drying.
Apply Antimicrobial Sprays
EPA-registered biocides neutralize surface spores. Saturate framing, sheathing, and subfloors thoroughly, following labeled dwell times.
Maintain Relative Humidity
Keep indoor RH below 60 percent using dehumidifiers and HVAC. Drier air slows colonization and increases safety.
Bag Contaminated Debris
Seal mold-stained drywall, carpet pad, or insulation in thick plastic, label it, and discard according to local regulations.
Schedule Post-Treatment Testing
An independent inspector should collect air and surface samples. A clearance report confirms remediation success and protects resale value.
Repair Structural Elements
Once moisture reads normal and mold risk wanes, permanent repairs restore integrity, appearance, and comfort. Treat this phase like a remodel, not a quick patch.
Assess Load-Bearing Components
Engineers verify joists, beams, and headers for rot or warp. Replacing compromised lumber now prevents future sagging.
Replace Damaged Wall Systems
Cut drywall at least 18 inches above the previous waterline, install mold-resistant panels, tape seams, and prime with stain-blocking sealers.
Upgrade Flooring Where Needed
Swap swollen particleboard with plywood, choose waterproof vinyl planks or tile in flood-prone rooms, and add vapor barriers between slab and finished surface.
Consider Sustainable Materials
Modern restoration embraces recycled gypsum, low-VOC paints, and FSC-certified lumber, aligning with emerging eco-standards highlighted by Water Damage Specialists’ guide.
Document Each Stage
Photograph framing, insulation, and plumbing before closing walls. Well-archived progress shots simplify warranty claims and reassure future buyers of professional workmanship.
Sanitize Affected Areas
Final cleaning eliminates lingering bacteria, allergens, and odors, transforming a construction zone back into a healthy, comfortable home.
- Disinfect hard surfaces: Mop floors, wipe walls, and scrub counters with a hospital-grade disinfectant, observing label contact times.
- Deep-clean soft goods: Steam upholstery, launder drapes in hot water, and send rugs to specialty cleaners.
- Polish HVAC quality: Replace filters, disinfect return ducts, and verify coils are clean to prevent musty odors.
- Neutralize lingering smells: Run activated-charcoal air scrubbers or ozone generators under professional supervision.
Conduct a meticulous walk-through, touching every knob, switch, and fixture. Your senses should confirm the home feels like home again.
Swift Recovery
Act methodically and you will prevent lingering damage, health hazards, and needless costs. Photograph everything, dry relentlessly, and rebuild only when moisture meters read safe. If saturated floor coverings resist drying, consider professional restoration to salvage materials rather than replace them. Lessons learned today will fortify tomorrow’s resilience.