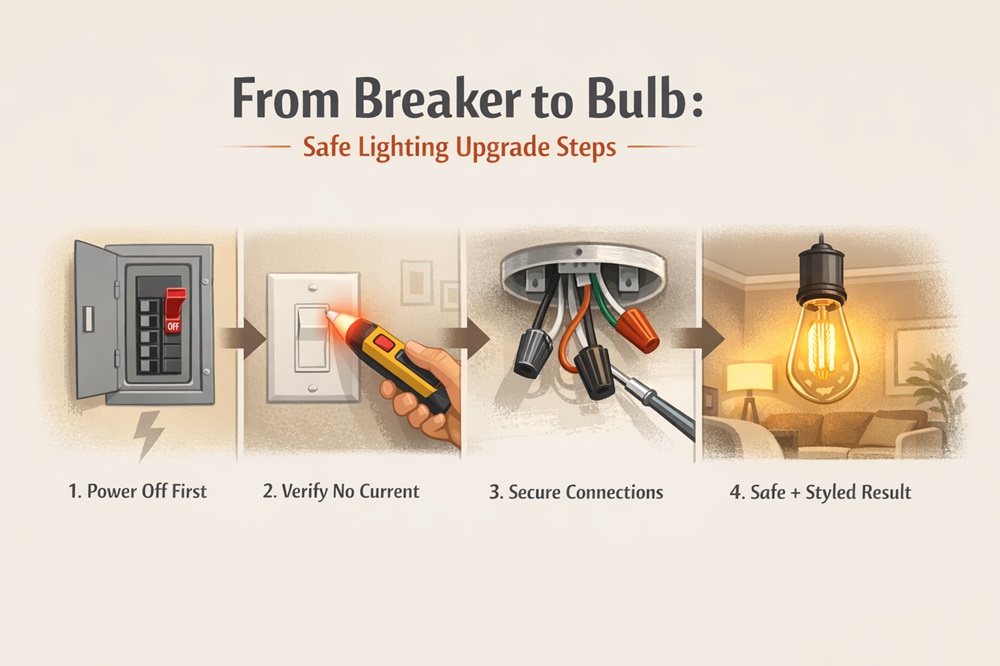
You’re about to swap plain switch plates for personality and coax ambient magic from everyday bulbs, but first run through a safety checklist.
Turn off the breaker supplying any circuit you will touch, test with a non-contact voltage tester, and keep a voltage meter nearby to confirm load limits.
Wiring is not rocket science, yet one loose connection can undo hours of creative effort or create a genuine hazard.
Refresh Floor Vent Grates
Dingy metal vents break the visual flow of a freshly styled room. A weekend refresh lets them blend – or boldly pop – without calling in a contractor.
- Shut off HVAC: Flip the system switch, wait for fans to stop, and unscrew each grate so stray screws or paint chips never fall inside the duct.
- Degrease thoroughly: Soak grates in warm dish-soap water, scrub with a nylon brush, and rinse until every last dust bunny and oily fingerprint disappears.
- Prime for adhesion: Lightly scuff with 220-grit sandpaper, then spray a rust-inhibiting metal primer outdoors, using long overlapping passes to avoid drip ridges.
- Add designer color: Choose matte black for industrial, champagne for glam, or match the floor stain for stealth. Apply two light coats, five to ten minutes apart, and allow a full 24-hour cure before reinstalling.
Need clarity on local code requirements before you tackle other wiring in the same space? You can always find out more about regulations and best practices early in the project.
Install Decorative Bulbs
Swapping a bland pear-shaped bulb for an eye-catching filament or globe instantly elevates a fixture, echoing the sculptural lines of modern furniture and hardware.
Choose the Right Base
Edison, candelabra, and GU10 bases dominate most homes. Confirm the socket type first so the artistic bulb you love actually screws in and illuminates.
Match Color Temperature
Soft-white 2700 K keeps bedrooms cozy, 3000 K feels spa-like in baths, and 4000 K shows true paint colors in kitchens. Consistency prevents the space from feeling disjointed.
Mind Lumens, Not Watts
LEDs sip power, so ignore wattage and focus on lumen output. About 450 lumens mimics a 40-watt incandescent – perfect for accent lighting over artwork.
Accent With Shapes
Tubular bulbs flank mirrors beautifully, while oversized globes dominate pendants above an island. Mixing shapes in one room adds depth, much like combining throw-pillow patterns.
Modernize Ceiling Fixtures
A dated flush-mount dome can drag a space straight back to the early 2000s. A streamlined fixture builds instant architectural interest overhead.
Cut Power and Prep
At the breaker box flip the correct circuit, verify with a non-contact tester, then remove the old fixture, noting wire colors before loosening wire nuts.
Select a Statement Piece
Flush-mount drum shades and slim LED disks maintain headroom yet cast generous diffusion. Brass or matte black frames align easily with most hardware palettes.
Upgrade the Junction Box
If the new fixture weighs more than 15 lb, install a fan-rated box to comply with code. Solid mounting prevents sagging and wobble when bulbs are replaced.
Wire and Level
Connect ground first, then neutral to neutral, hot to hot. Tug gently, tuck neatly, and tighten the canopy flush so shadows do not highlight ceiling imperfections.
Convert Recessed Can Lights
Recessed cans shout builder-grade. Conversion kits let pendants or flush-mounts dangle from the same hole, no drywall patching required.
Select the Kit
Choose a UL-listed retrofit kit compatible with your can’s diameter – usually 5 or 6 in – and with an E26 screw base to simplify wiring.
Anchor Securely
Screw the adapter into the existing socket, slot the crossbar, and tighten the side springs until the plate sits level against the ceiling drywall.
Balance the New Fixture
Most kits include adjustable cords. Hang a pendant 30 in above a countertop or 72 in from the floor in open areas for balanced sightlines.
Dimmer Compatibility
LED pendants require an ELV or CL dimmer. Verify that the fixture driver matches the wall control to avoid flicker during relaxed dinner parties.
Swap Light Switch Plates
Cracked almond plates make even fresh paint feel old. Stylish replacements require zero electrical skill, yet deliver gratifying, instant polish.
- Confirm gang size: Count switches in each box, then buy matching cover plates – single, double, triple – so screws align properly and edges sit flush.
- Coordinate finishes: Satin nickel complements stainless appliances, while matte black contrasts white walls. Carry the finish through hallways for a designer’s intentional repetition.
- Use paintable options: Primed plastic plates disappear against bold wallpaper or accent walls, keeping focus on art rather than hardware.
- Tighten evenly: Start screws by hand, alternate top and bottom turns to prevent cracking, and stop once plates are snug, not sunken into drywall.
Update Outlet Faceplates
Outlets sit lower, yet they are plentiful – mismatched ones stand out when guests charge phones. Matching faceplates refine the room, especially against colorful baseboards.
- Label breakers: Before removing screws, tag each circuit at the panel. Later projects become quicker and safer when breakers are clearly identified.
- Switch to tamper-resistant receptacles: Modern TR outlets protect kids and meet current code; the internal shutters block prying paperclips and curious pets.
- Employ USB combos: Replace select outlets near nightstands or counters with integrated USB-C ports so charger bricks can disappear.
- Snap decorative covers: Oversized screwless plates hide wall blemishes from earlier paint jobs, achieving that crisp, new-construction vibe.
Tune Ambience With Bulbs
Light shapes mood as much as furniture. Strategic bulb swaps create zones – energizing mornings in kitchens and calming evenings in dens – without altering existing wiring.
Start by mapping daily routines: bright task lighting on countertops, low-glare glow near TV screens. Layer multiple fixtures so dimming one does not plunge an area into darkness.
Smart bulbs like Philips Hue or Nanoleaf pair with voice assistants, letting a simple “movie time” command shift brightness and color temperature to cozy amber tones.
For renters, color-changing plug-in lamps achieve similar effects. Hide them behind plants, bounce light off walls, and watch rooms expand visually without any construction.
Add Smart Patio Lights
Outdoor café vibes are possible at home. Weatherproof smart strings and sconces extend living space, boosting curb appeal and resale value.
Plan the Circuit
Outdoor GFCI outlets should power patio lights. If one is absent, add it using code-compliant conduit. Safety matters whenever electricity meets rain, puddles, and curious pets.
Select Durable Fixtures
Pick UL Wet-Rated bulbs and heavy-gauge wiring that tolerate temperature swings. Brands like Enbrighten guarantee shatter resistance for years of backyard dance parties.
Automate Scenes
Pair lights with a hub or phone app. Schedule sunset activation or create motion-triggered security scenes, deterring prowlers while impressing neighbors.
Install Securely
Use stainless hooks under eaves and plastic-coated cable guides between trees. Maintain gentle dips for bistro aesthetics but avoid slack that collects rainwater.
Final Spark
You now possess practical tweaks to complement any design vision. Keep circuits off before touching wires, label every connection, and verify load limits with a meter. When in doubt, consult a licensed electrician. Safe habits today prevent costly repairs and protect everyone under your roof.